
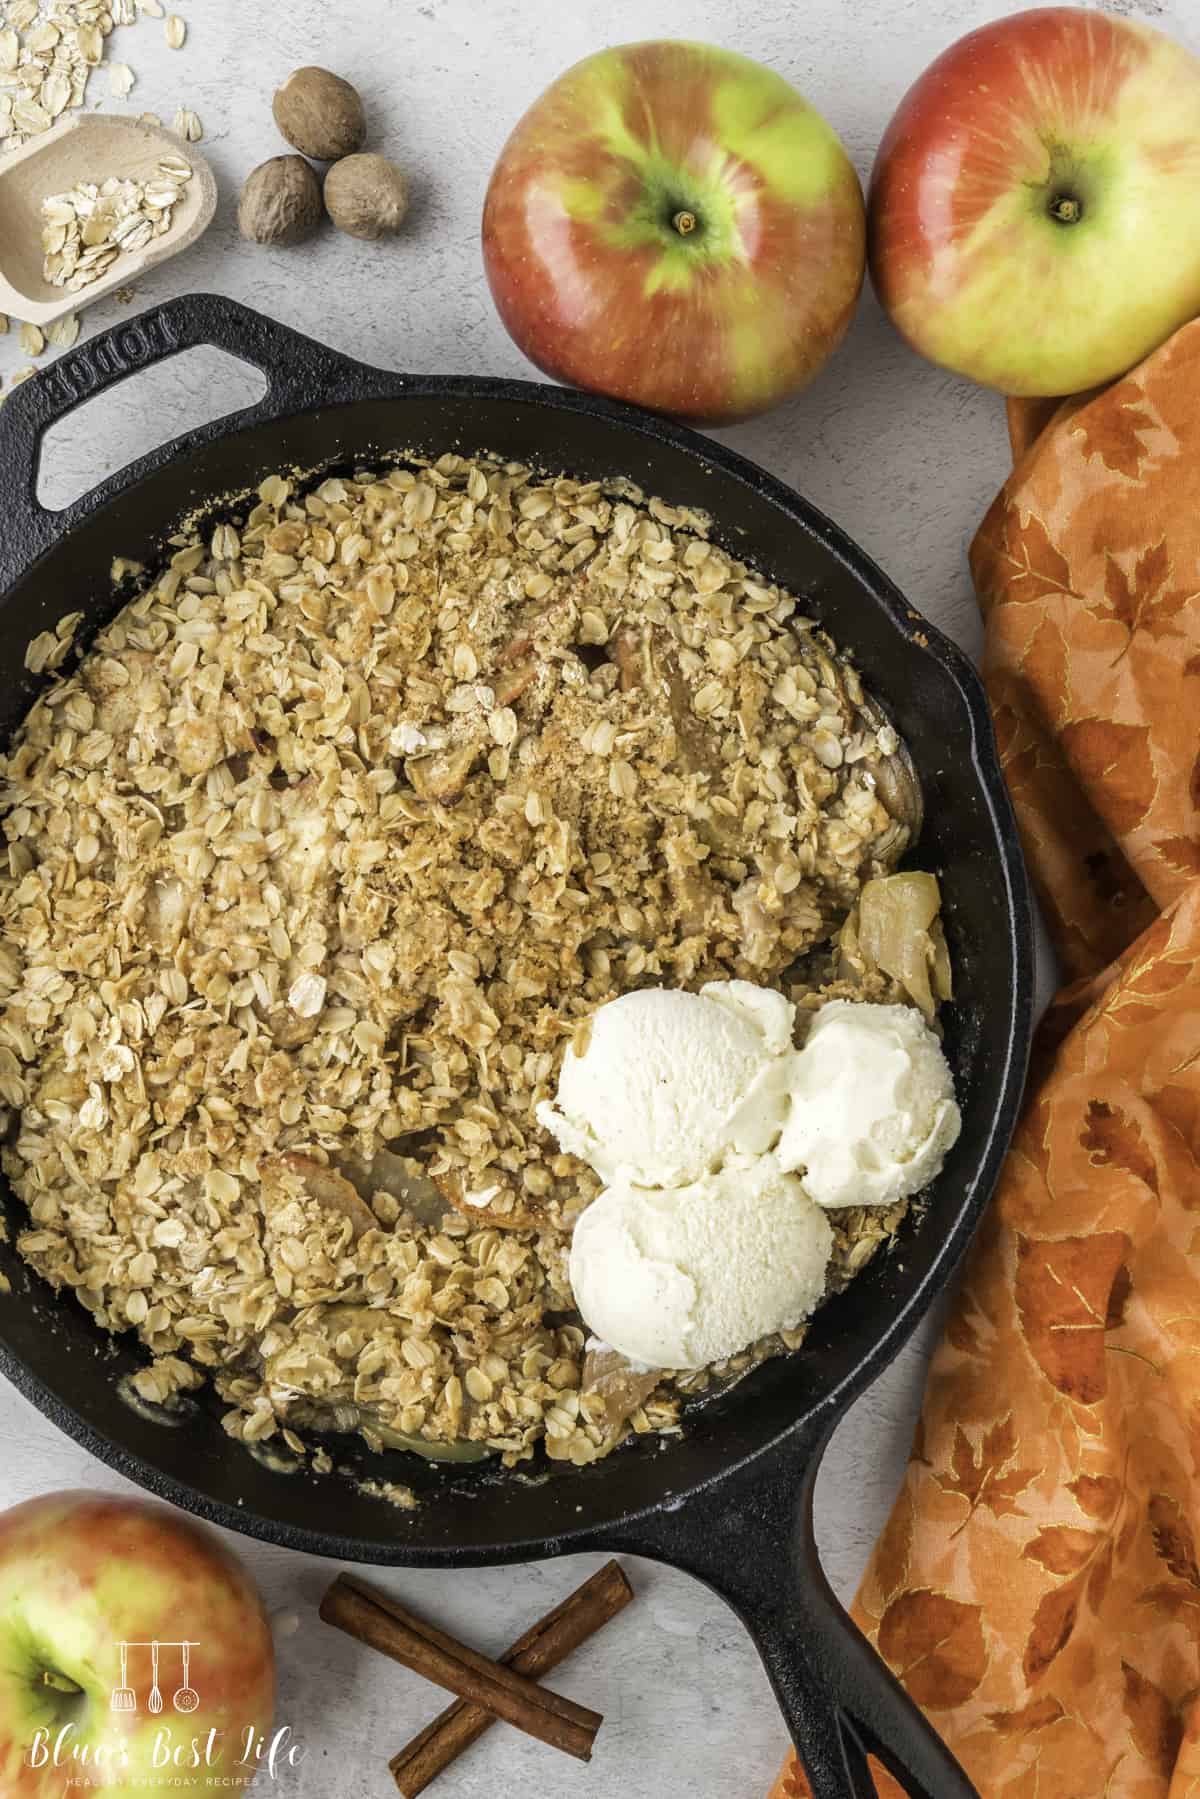
Love apples? Then this Easy Cast Iron Skillet Apple Crisp Recipe With Oats is going to become a family favorite. It is loaded with sweet and delicious crisp apple flavors and warm spices. Add a scoop of vanilla ice cream on top for a treat no one can resist!
Want to Save This Recipe?
Enter your email & I'll send it to your inbox. Plus, get great new recipes from me every week!
By submitting this form, you consent to receive emails from Blue's Best Life.
(Blue's Best Life is a participant in the Amazon Affiliate Programs. I earn a small commission if you purchase through those links. This helps me keep the blog going!)- Bobbie
Table of contents
- Why You'll Love This Cast Iron Apple Crisp Recipe!
- Equipment Needed
- Key Ingredients
- Step-By-Step Instructions
- Serving
- Storage
- Substitutions And Additions
- Do I Have To Use A Cast Iron Skillet For This Recipe?
- Should You Cover Apple Crisp When Baking?
- Why Is It Important To Use Cold Butter When Preparing Apple Crisp?
- Is It Necessary To Peel Apples For Apple Crisp?
Why You'll Love This Cast Iron Apple Crisp Recipe!
With fall in the air, it is the perfect time of the year to share with you an epic dessert and this one is packed full of flavor. You may argue that the classic apple pie is a front runner but this easy cast iron apple crisp is one recipe to rival that tradition. I love how the caramelized apple filling is topped with crunchy oat topping. The best part is how simple this crisp is to make!
Sometimes you just want something that will satisfy that sweet tooth craving and this easy apple crisp dessert is perfect. You could serve this up at Thanksgiving, take it to your next potluck, or just enjoy it with the family at the weekend. It's the perfect recipe if you have a lot of apples from your garden or if you have been apple picking in a local apple orchard. If you are a fan of fresh apples then you are going to love this recipe.
- The perfect fall dessert - Apples and cinnamon are a flavor combination that resonates with fall.
- Simple ingredients - Tart apples, subtle spices, along with a crunchy topping make a delicious apple and oat dessert.
- Easy to make - This easy apple dessert requires just slicing a few apples and using a pastry cutter to cut in the butter. Nothing to complicated for this classic dessert.
Equipment Needed
Lodge cast iron skillet- I love my cast-iron skillet and use it for searing and baking. My skillet is a 10 inch but you can use a small size and the crisp will be a little thicker.
- Sharp knife
- Chopping board
- Large bowl
Key Ingredients
apples- It is really personal preference when it comes to the type of apple. There are many apple varieties but make sure it is one that holds up well when baked. Granny Smith, Honeycrisp and Pink Lady are great options.
butter - Used for the filling as well as the crispy oaty topping. Unsalted butter works best.
white and brown sugar - This will help sweeten not just the apple filling but also caramelize the oat topping.
ground cinnamon - Used for the filling as well as the crispy oaty topping. This is the flavor of fall and works perfectly with apples.
nutmeg, cardamom, and allspice - These are the additional warm spices to intensify the flavor of the apple filling.
all purpose flour - Combing the flour with the cold butter will help to create that crumbly topping.
oats - I used rolled oats for this recipe. You do need old-fashioned oats in order to get the right texture for the crisp topping.
Step-By-Step Instructions
Start by coring and slicing the apples for the crisp. It is best to cut them about a ¼ inch in thickness and make them as uniform in size as possible so they cook evenly.
Preheat your oven to 350° F. Heat a cast iron skillet over medium heat and melt a tablespoon of butter.
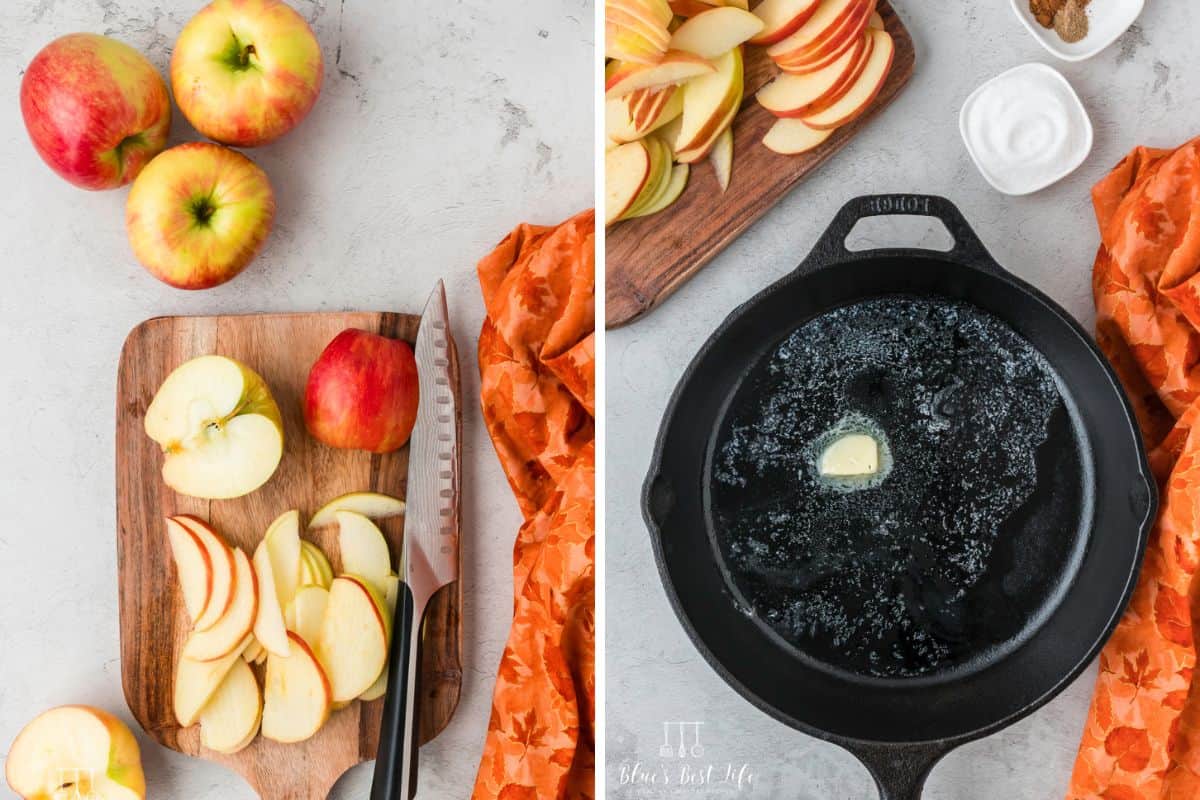
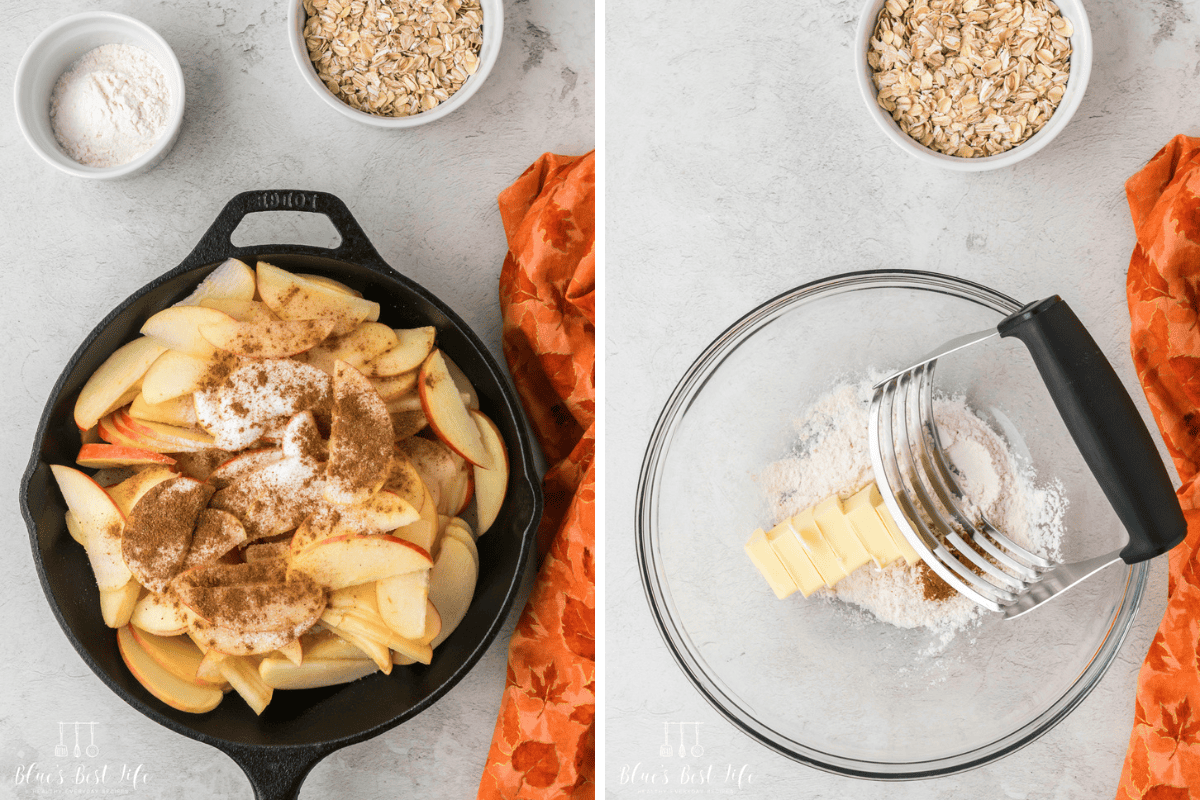
Add the sliced apples to the skillet along with the white sugar, and spices for the apple filling. Toss to coat and remove from the heat.
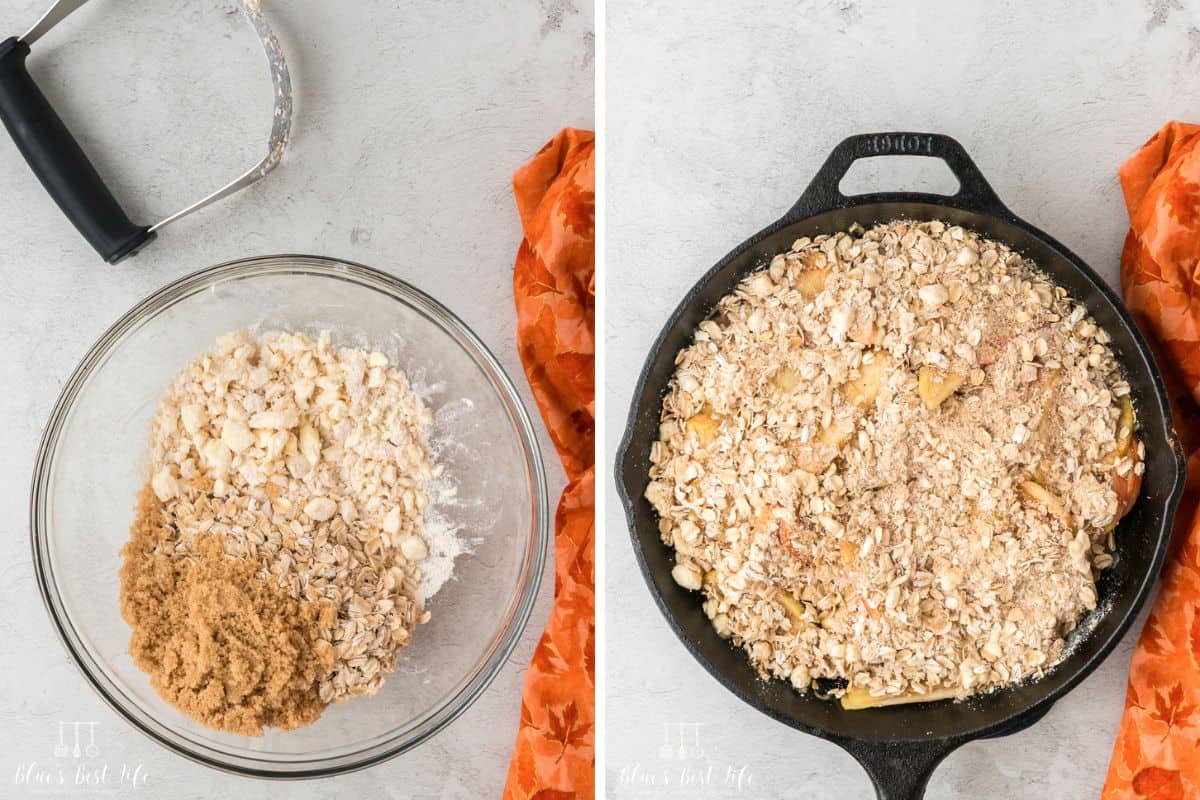
Meanwhile make the topping for the apple. Add the flour to a large bowl with 5 tablespoons of cold butter cut into slices. Use a pastry cutter or knives to cut the butter into the flour intil it resembles small clumps.
Then add the brown sugar and cinnamon for the topping and continue to combine the ingredients. Then sprinkle over the apple mixture.
Bake in the preheat oven uncovered so that the top of the crisp turns a beautiful golden brown. Because the cook time will depend on exactly how thick the apples are sliced and the variety of apple you use, check the apples often to make sure that they do not over cook. Just use a fork to poke them and remember they should be softened but not mushy. I usually start to check after 25 minute and it may take as long as 40 to cook completely.
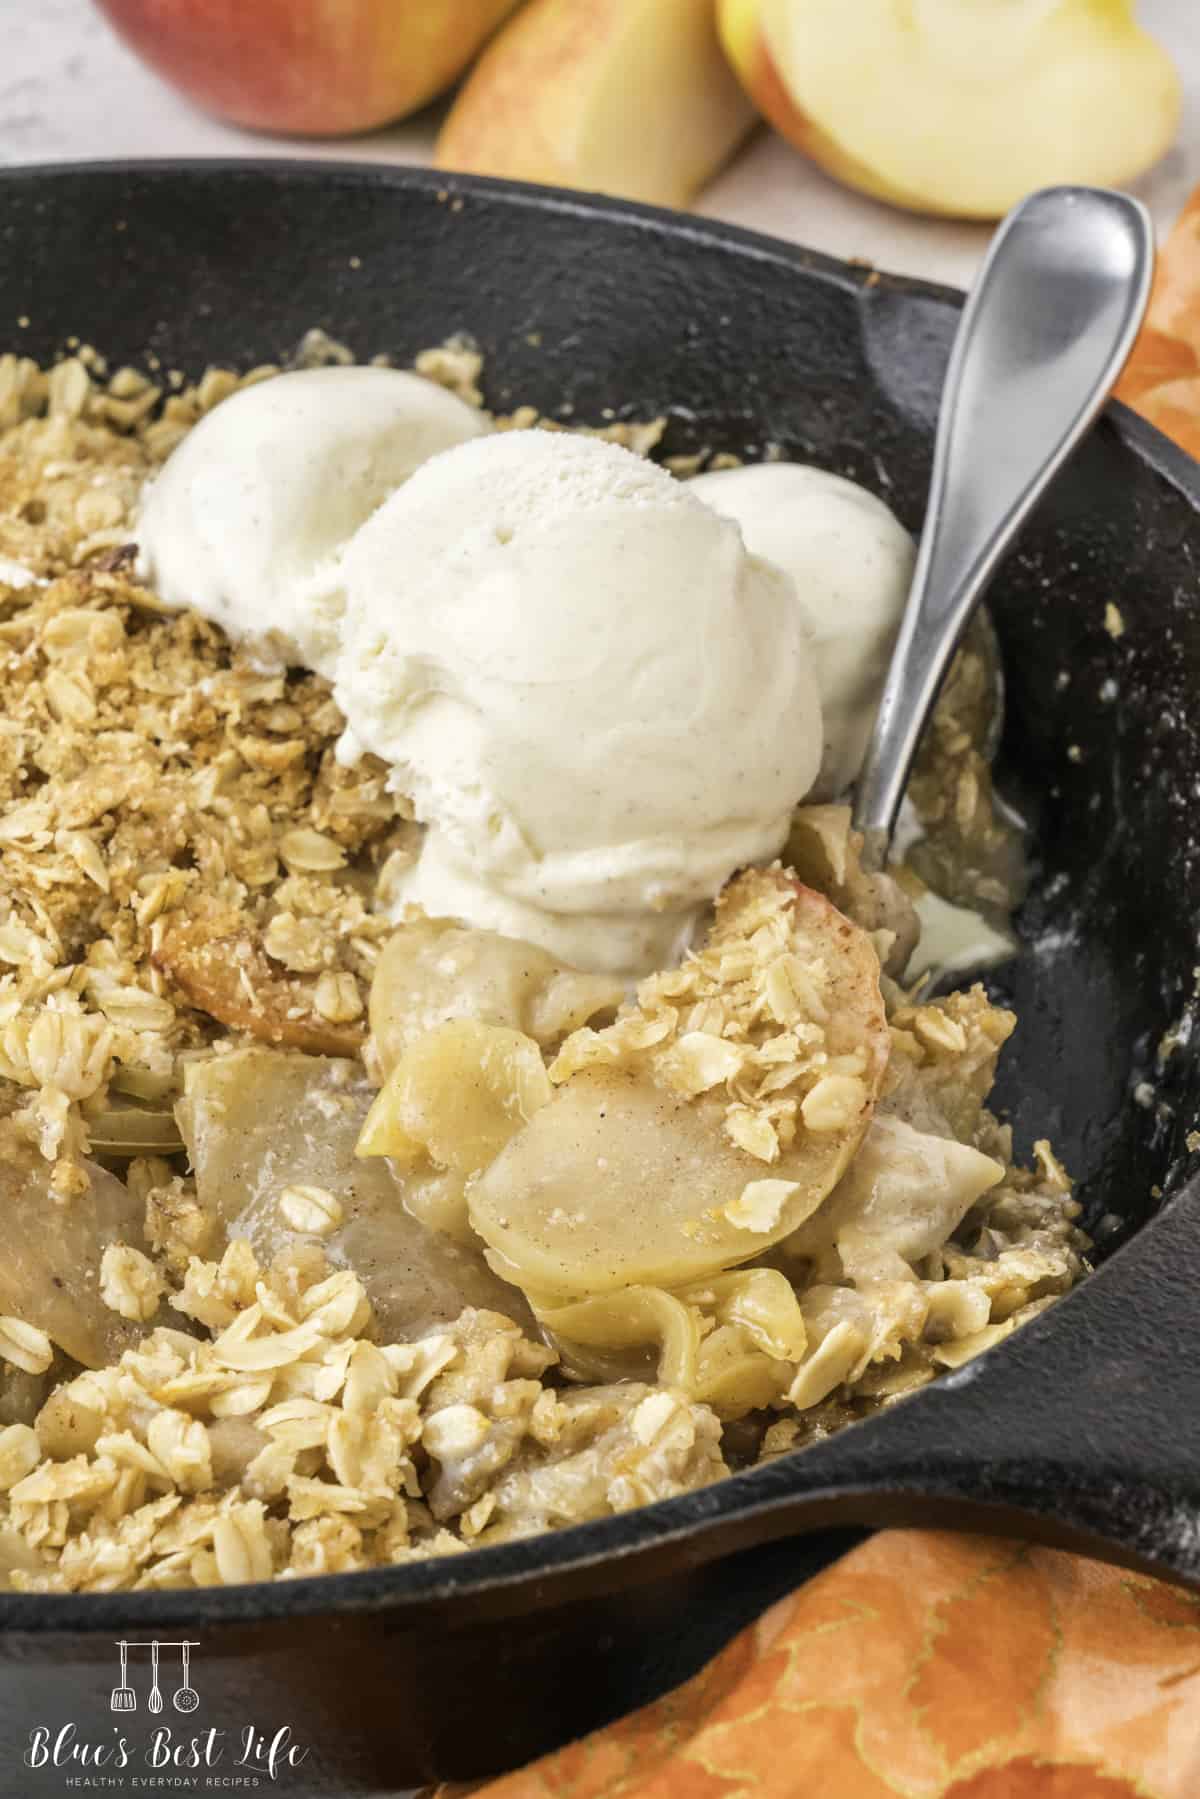
Serving
Once the crisp has finished cooking, allow it to cool for 10 minutes so that all of the juices can cool down into a syrup like consistency. Add scoops to a plate or a bowl and top with vanilla ice cream or whipped cream. A drizzle of caramel sauce is also a delicious addition!
Storage
This apple crisp dessert can be stored in the refrigerator for 3-4 days. You can either let it cool in the pan it was baked in and wrap it in plastic wrap or you can transfer the cooled leftovers to an airtight container.
You can also freeze these apple desserts. Bake and then portion up into individual portions and freeze for up to three months. Let it thaw in the refrigerator for 4-5 hours before heating up in the oven or the microwave.

Substitutions And Additions
- Extra toppings - You could add some chopped walnuts or pecans to the top of apples with the oats. The nutty flavors will work so well.
- Caramel sauce - Drizzle some caramel sauce over the top before serving.
- Spices- if you do not have nutmeg, cardamom and allspice on hand you can always use extra cinnamon instead or use an apple spice blend in its place.
Do I Have To Use A Cast Iron Skillet For This Recipe?
No! If you do not have a cast iron skillet that is no problem. You can melt the butter in the microwave and toss the apples with the butter, sugar and spices in a large bowl and add them to a casserole dish or deep dish pie plate. It really doesn't matter as long as it will hold the apples and is oven safe.
Should You Cover Apple Crisp When Baking?
You don’t need to cover the apple crisp dessert when baking in the oven. Having it uncovered will help to get that crunchy texture on the top and allow the topping to become golden brown and delicious.
Why Is It Important To Use Cold Butter When Preparing Apple Crisp?
Cold butter helps to get that crunchy textured oat topping. Using room temperature or melted butter will cause that topping to spread and not have the same golden and crisp texture.
Is It Necessary To Peel Apples For Apple Crisp?
When it comes to the apple chunks it is a personal preference as to whether you peel the apples. You really don’t need to peel the apples and it saves time when prepping the dessert.
Did you try this recipe? Please let me know what you think! Leave a comment below, and a 5- star rating. I would love to hear from you! Subscribe Here to get new recipes sent straight to your inbox!

Cast Iron Skillet Apple Crisp Recipe With Oats
Equipment
- 10 inch cast iron skillet
Ingredients
Apple Filling
- 5 large apples, sliced into ¼ inch thin slices
- 1 tablespoon butter
- 2 tablespoons sugar
- ¼ teaspoon cinnamon
- ⅛ teaspoon nutmeg
- ⅛ teaspoon cardamom
- ⅛ teaspoon allspice
Crisp Topping
- ¼ cup flour
- 5 tablespoons butter, cold
- ¾ cup oats
- ¼ cup brown sugar
- ¼ teaspoon cinnamon
Instructions
- Preheat oven to 350° F.
- Slice apples into ¼ inch thin slices, trying to make sure they are uniform in size. (You can peel the apples or leave the peel on depending on your preference.
- Heat the cast iron skillet over medium heat and add the butter to melt. Add apples to the skillet and toss to coat in the butter and sprinkle with the white sugar, cinnamon, nutmeg, cardamom, and allspice. Remove from heat and use a spoon to stir to coat with sugar and spices.
- In a large bowl add the flour and the 5 tablespoons of butter. Use a pastry cutter or knives to cut the butter into the flour. Add the oats, sugar and cinnamon. Continue to cut the mixture until it resembles pea-sized lumps.
- Sprinkle over the top of the apples and place the cast iron skillet in the preheated oven to bake.
- Bake for 25-35 minutes. Check with a fork, the apples should be fork tender but not mushy. Check often because the cook time will vary depending on the variety of apple you use and exactly how thin they are sliced. If the apples need more time you can cover the top with foil so the top of the crisp does not over brown.
- Remove from oven and cool for 10 minutes before serving. Seve with vanilla ice cream or whipped cream.


Leave a Reply